Let’s say you’re a developer and the application you’re building lets you flag both an upcoming task and an upcoming event. Most stock icon libraries, like Font Awesome, include a flag icon that would typically be used to represent something that needs user attention. But if you’ve got two things or more to flag, like tasks and events, using the same icon can be very confusing for your user.
One way you can address this is to create your own custom flat icons to help your users distinguish between the two.
In this second installment of the series, I’ll show you how to create your own flat icons, including the icons for upcoming tasks and events, and group them into a library. Before you read further, though, check out Part 1 of this series first.
Step 1: Make a list of all Application Icons
The first thing you need to do is create a list of the icons required for each feature, function or graphical element the user will interact with in your application. If you have a graphic artist on your team, you have the advantage of defining your own unique icon style for your application. For this tutorial we’ll just use royalty-free stock icons available on the web.
We’ll create two icons to represent the “upcoming task” and “upcoming event” activities mentioned earlier in our example. For tasks, a checklist icon seems to be a good match. For events, we’ll start with a calendar icon. If we then add the flag icon to each of these, we end up with two new icons that better represent our web app’s functions. The following figure illustrates the three web icons that we’ll use to create our new icons.
![]()
Step 2: Choosing the right tools
There are many free online tools out there that provide the ability to create font icons. In our tutorial, we’ll show you how to create a font icon library by using a popular online tool called IcoMoon).
To create our icons, we go to the IcoMoon’s website and click on their “IcoMoon App” button at the top right of the screen (note that IcoMoon seems to work best with Google Chrome).
IcoMoon provides the ability to import your own vector-based icons (in .svg format) or use existing icons from a wide variety of free or available-for-purchase icons on their website.
To import your custom icons, go to Step 5.
Important Note: If you created your own flat icons, here are some tips to ensure that the icons are rendered correctly by IcoMoon:
- IcoMoon ignores images containing “strokes” (a stroke is similar to an outline around a box or circle, etc.). Therefore, strokes must be converted to fills.
- Unite and combine multiple or overlapping icons or shapes into one solid shape.
- The use of color will be ignored. Black is the default.
- To snip out a portion of an icon, do not use a white shape. Use the graphics editor’s operations such as “snip” or “difference” to remove a shape from another one.
- Any bitmap images (.bmp, .jpg, .png) added to the final .svg image will not be converted into a vector-based image. IcoMoon will ignore them.
Step 3: Selecting Icons from Existing Icon Libraries
IcoMoon provides a quick keyword search feature that makes it easy to track down the icon you’re looking for. For our example, we’ll start from stock icons as shown earlier.
Click on the “menu” icon and select the “New Set From Selection” option.
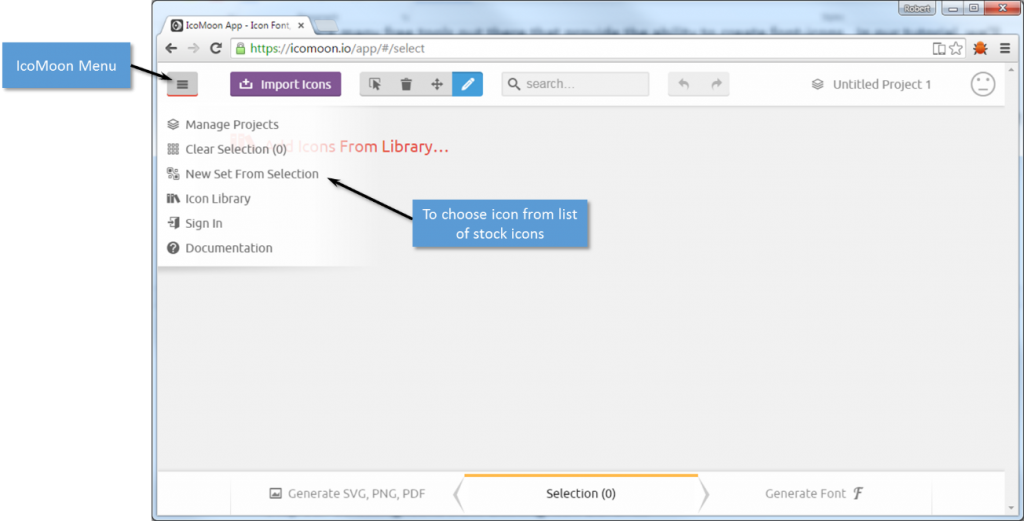
To find an icon from IcoMoon’s list of stock icons, enter keywords in the search bar. The search bar is dynamic and icons matching your keyword will appear (both free icons and for purchase). For our example, we entered the keyword “task list”.
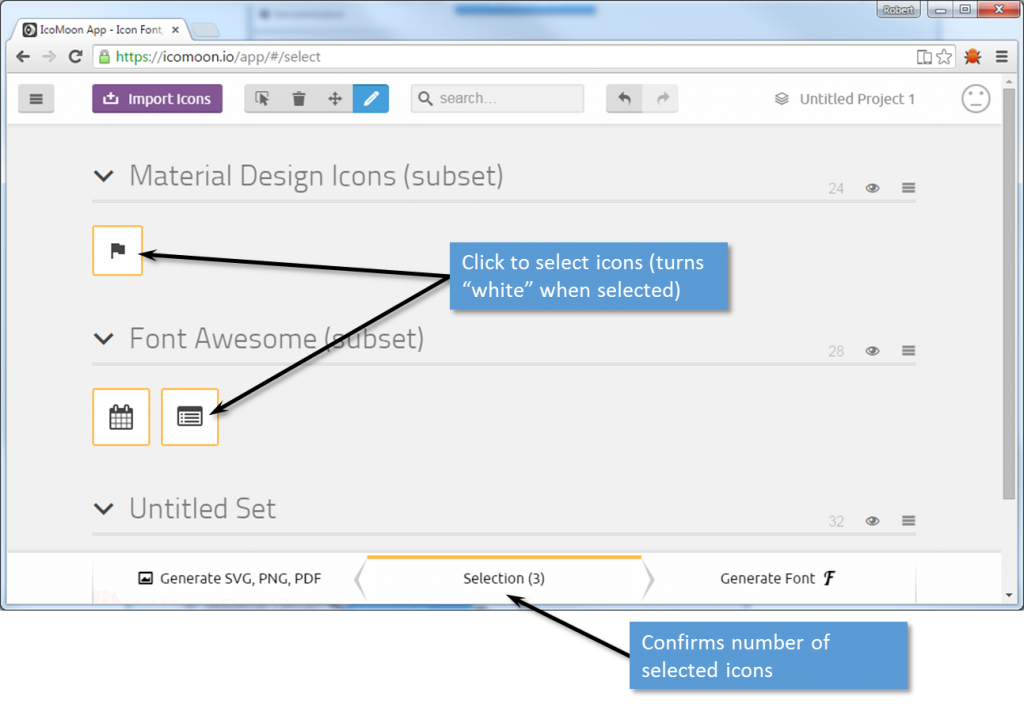
The following possible icons appeared (they are grouped by the font icon library they belong to). Click on the icon that best represents your application’s purpose. In our example, we selected one of the task icons from “Font Awesome”. Repeat this step for all the icons you need for your web application.

When you have found and selected your list of icons, make a final selection by selecting the ones you will keep. When an icon is selected, it turns white and the “Selection” indicator bar at the bottom of screen will show the number of icons selected. For our use case example, we selected our three icons:
You can now download your icons for editing. Click on the “Generate SVF, PNG, PDF” button in the IcoMoon task bar at bottom of screen. Your selected icons will be displayed on a new page.
Then, click the “Download” button at the bottom-left of the screen. IcoMoom will generate SVG and PNG versions of your selected icons and download them to your PC in a .zip file.
Step 4: Editing the icons
This step requires a vector graphics editor to modify the SVG files. I like Microsoft Visual Studio or Inkskape (the latter is a free download). IcoMoon also offers a tool to edit the icons but it only has a few basic features.
Once you’ve familiarized yourself with a vector graphics editor, perform the following:
- Launch the graphics editor and create a work area of 64px by 64px.
- Open one of the icons you’ve downloaded (use the .svg version of the icon provided by IcoMoon). If you are combining icons, insert the other icons into the same work area.
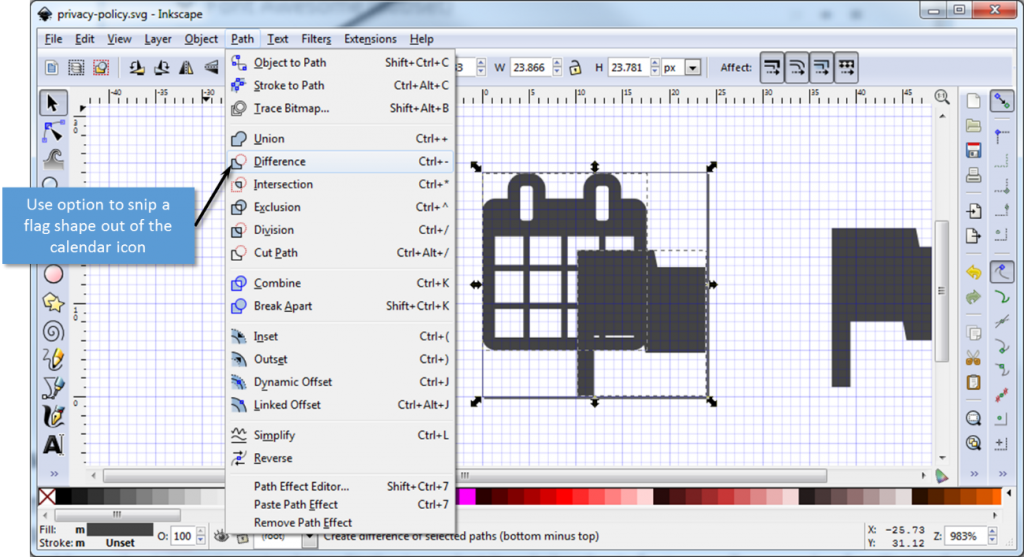
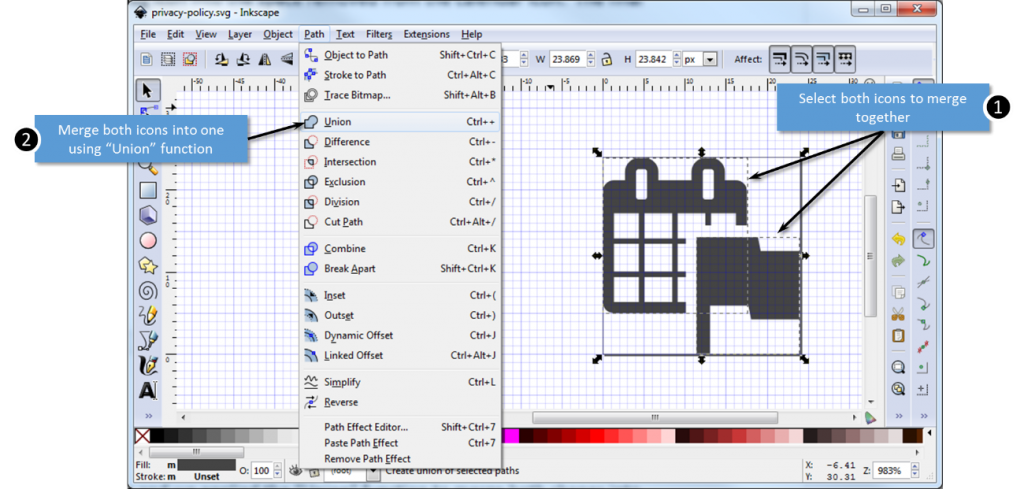
- Use the available image editing tools to modify your icons. For our example, we used Inkskape’s “Difference” editing function to snip or punch out a portion of the calendar icon using the flag icon. The following illustrations show the before and after view of the “difference” operation:
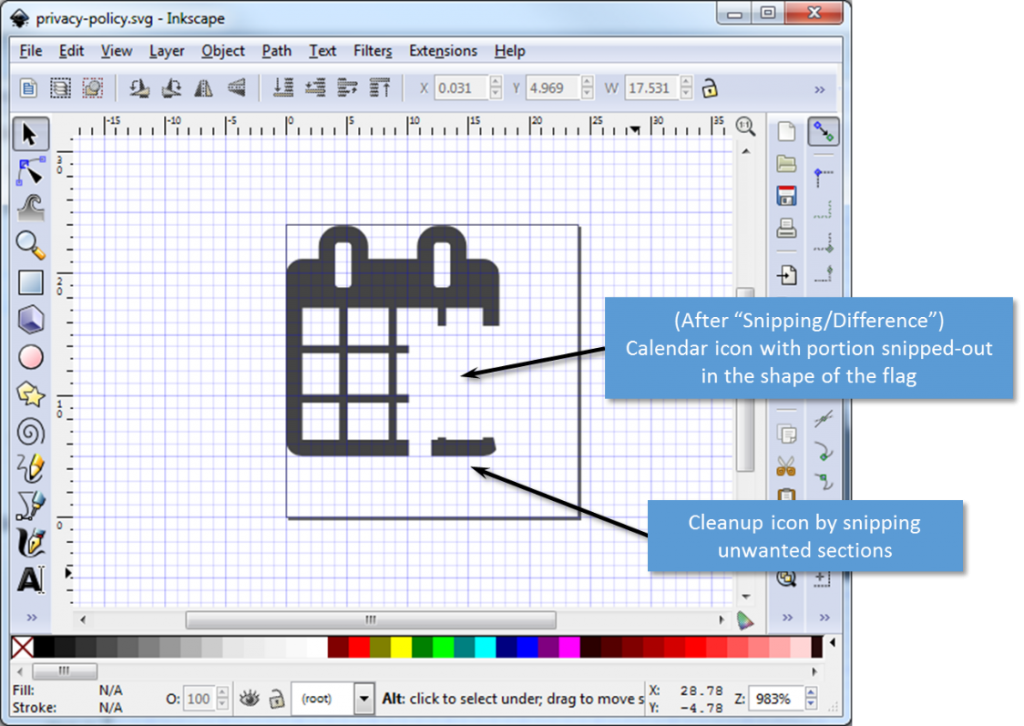
- Resize and reposition the flag icon into the space removed from the calendar icon. The final result is as follows. To complete the icon, we need to merge the two icons into one shape by first selecting both icons and performing the “Union” operation.
- Save each icon as “.svg” files (make sure to perform the “union” operation on your icons if you used two or more shapes together). Repeat the steps above to modify additional icons.
Step 5 : Importing the New Flat Icons Into IcoMoon
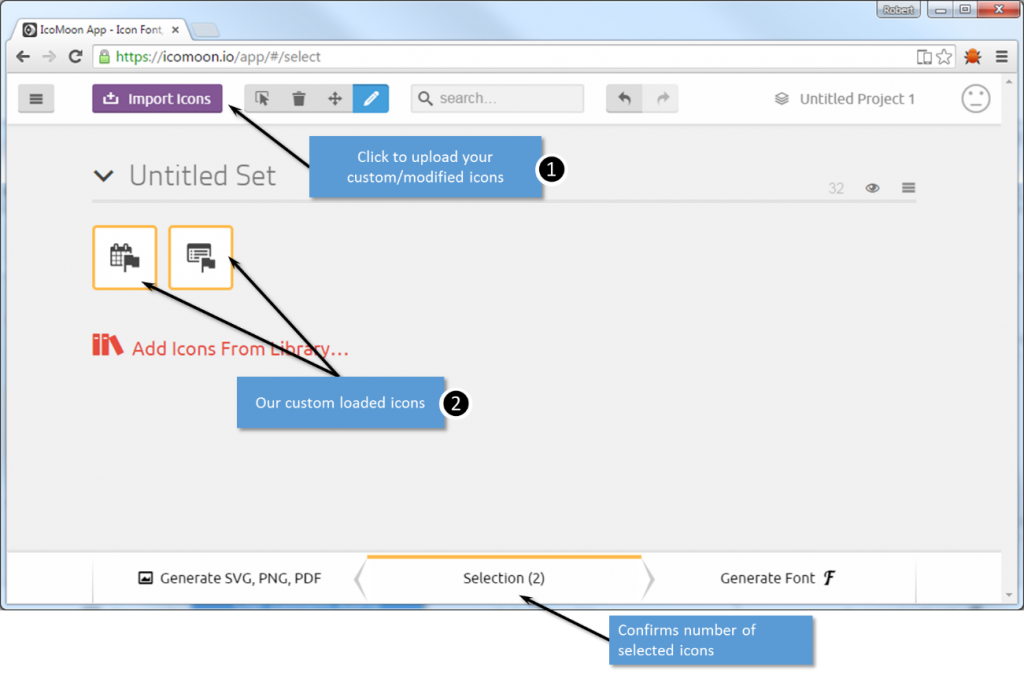
Once you are happy with the design of your flat icons, go back to the IcoMoon web site and select the “Import Icons” option in the menu bar. A file explorer window will appear. Select your icons to import. IcoMoon will display your icons in a matrix as shown in the example screenshot below.
- If some of the boxes do not contain an icon, this means that IcoMoon had trouble rendering your icon. Make sure to remove any “stroke” features and that you have combined multiple icons together into a single icon image. Edit your icon again in your image editor then re-import it into IcoMoon.
- Select each icon to include in your icon-library by clicking it. It will turn white when selected. IcoMoon indicates in the bottom task bar how many icons have been selected.
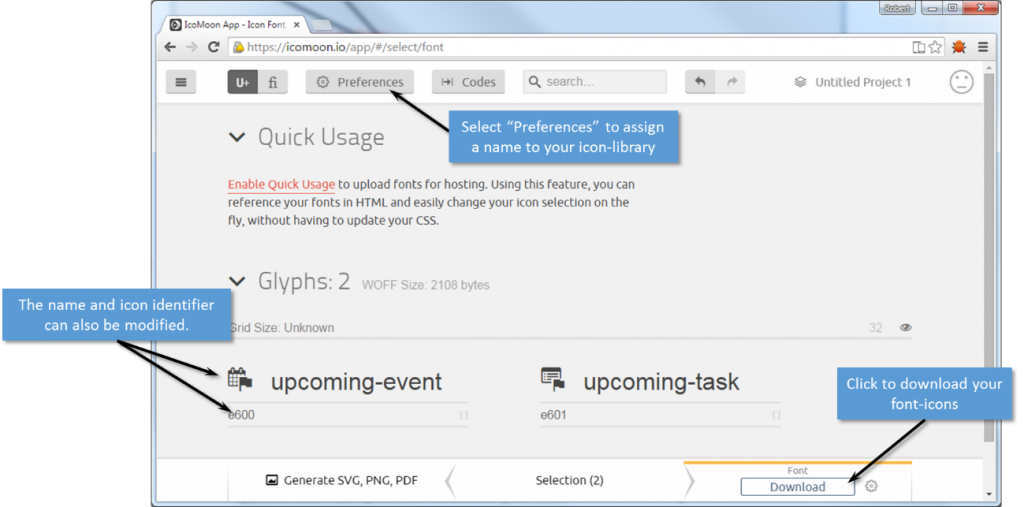
- Click the “Generate Font” button at bottom right of the screen. After this operation, IcoMoon will display your icons. IcoMoon gives a default name to your icons but also provides the ability to rename them. Click on the name or icon identifier to change them. Also, to assign a name to your new icon-library, click the “Preferences” button at top of screen and follow on-screen instructions.
Next, click the “Download” button at bottom-right of the screen. Icomoon will convert all your icons into a font library file and provide you with a .zip file containing everything you need to integrate them into your website or web application, including:
- Font files (4 different font files for compatibility with various web-browsers)
- CSS style sheet
- Demo HTML file (example on how to use your new font icons)
- selection.json (this file can be used to re-import your entire suite of font icons back into icoMoon using the “Manage Project -> Import Project” options)
Et voilà! You have now created your own icon-fonts!
Hope this tutorial was helpful and demonstrated the advantages of using a custom font icon library to create flat icons. Customized flat icons will help you showcase your brand by ensuring that your websites and applications break away from the generic look-and-feel you currently see everywhere on the web. Most importantly, though, these customized icons will help your users enjoy a superior experience when they’re using your app.

Robert Litalien
Robert is a technical project lead at NetFore and an expert in UX design.